Introduction
This document describes the configuration of MikroTik RB951 devices for use with ECLOUD and should be compatible with other devices in this series. Although settings can be configured via the GUI (winbox.exe) or web interface, this guide provides configuration through SSH. Please note that we cannot assist you in the configuration of your firewall.
Step 1: Disable SIP ALG
- Log into the firewall. In the command line enter:
ip firewall service-port disable sip
Step 2: Configure Port Forwarding (NAT)
You now need to port forward the following ports in order to support configuration of SBCs, Remote Extensions and VoIP Providers. The full list of default ports required can be found here.
While still logged into the firewall, enter the following commands:
- ip firewall nat add chain=dstnat action=dst-nat to-addresses=[ECLOUD Server LAN IP] to-ports=[HTTPS Port] protocol=tcp dst-port=[HTTPS Port] comment=”ECLOUD Presence and Provisioning HTTPS”
- ip firewall nat add chain=dstnat action=dst-nat to-addresses=[ECLOUD Server LAN IP] to-ports=[SIP Port] protocol=udp dst-port=[SIP Port] comment=”ECLOUD SIP UDP”
- ip firewall nat add chain=dstnat action=dst-nat to-addresses=[ECLOUD Server LAN IP] to-ports=[SIP Port] protocol=tcp dst-port=[SIP Port] comment=”ECLOUD SIP TCP”
- ip firewall nat add chain=dstnat action=dst-nat to-addresses=[ECLOUD Server LAN IP] to-ports=[SIP Port + 1] protocol=tcp dst-port=[SIP Port + 1] comment=”ECLOUD SIP TLS”
- ip firewall nat add chain=dstnat action=dst-nat to-addresses=[ECLOUD Server LAN IP] to-ports=9000-10999 protocol=udp dst-port=9000-10999 comment=”3CX Media UDP”
- ip firewall nat add chain=dstnat action=dst-nat to-addresses=[ECLOUD Server LAN IP] to-ports=[Tunnel Port] protocol=tcp dst-port=[Tunnel Port] comment=”ECLOUD Tunnel TCP”
- ip firewall nat add chain=dstnat action=dst-nat to-addresses=[ECLOUD Server LAN IP] to-ports=[Tunnel Port] protocol=udp dst-port=[Tunnel Port] comment=”ECLOUD Tunnel UDP”
Note that in the above commands you must replace the section in the brackets with the correct port for your setup.
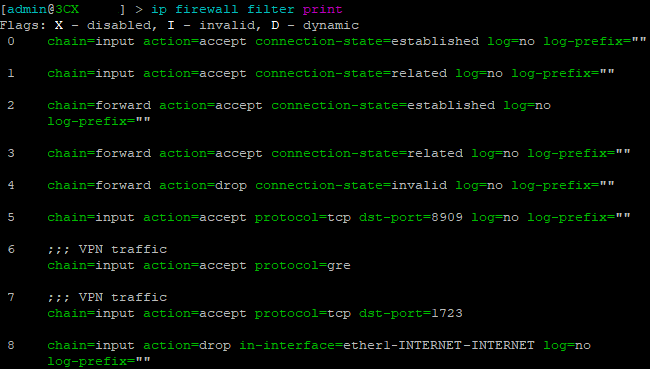
Step 3: Inbound Access List (PAT configuration only)
If you have a 1 to 1 NAT, you can skip this step. If you have a PAT configuration you must create the following access rules using these commands:
- ip firewall filter add chain=input action=accept connection-state=established
- ip firewall filter add chain=input action=accept connection-state=related
- ip firewall filter add chain=forward action=accept connection-state=established
- ip firewall filter add chain=forward action=accept connection-state=related
- ip firewall filter add chain=forward action=drop connection-state=invalid
- ip firewall filter add chain=input action=drop in-interface=[Interface Name]
- ip firewall nat add chain=srcnat action=masquerade out-interface=[Interface Name]
Note that in steps 6 and 7, you are required to enter the “in-interface” name you are using for ECLOUD (the one with the public ip address). All interface names can be listed using the following command:
/interface print
Step 4:Validating Your Setup
- Log into your ECLOUD Management Console → Dashboard → Firewall and run the ECLOUD Firewall Checker. This will validate if your firewall is correctly configured for use with ECLOUD .
- Check the Firewall configuration using the following commands:
> ip address print- > ip firewall nat print
> ip firewall filter print